6: Inside my Scrivener Setup - How I Organise my Entire Fantasy World
- Renee Ella

- Jun 30, 2025
- 4 min read
Updated: Aug 3, 2025
Today’s post is a personal one: a behind-the-scenes look at how I’m organising my debut fantasy novel in Scrivener—and the systems that are helping me stay on track to finish my first draft by 31 December 2025.
Now, this is just my process. If something resonates, amazing. If it doesn’t, feel free to leave it. I personally love reading about how other writers set up their behind-the-scenes spaces, and this system is a mix of all my favourite ideas from authors and aspiring authors alike.

Why Scrivener?
I’ve tried a few writing tools (Google Docs, Word, Novlr) but nothing hits quite like Scrivener.
I love organisation.
I love everything having its place.
I love colour coding and aesthetics.
Scrivener gets me.
The way I’ve set it up has made my writing process feel so much smoother. So let’s break it down.
My Scrivener Sections
My project (creatively titled First Draft, because I still have no idea what to name my book yet) is split into six main sections:
First Draft – where the actual story lives
Characters – all of my character profiles
Worldbuilding – the breakdown of the five kingdoms of my fantasy world
Planning & Research – the series outline, themes, past draft chapters, and inspiration
Notes – a chaotic idea-dump and future fix-it zone
Template Sheets – blank templates for characters, worldbuilding, and scenes

Side Note:
Can we all agree naming your book is the hardest part of writing?
Twelve-year-old me? She had eight titles lined up before finishing the first chapter of book one. The very original version of this book was called Rikki Long: The New Beginning—clearly Harry Potter coded. Twelve-year-old me was adorable!
SECTION ONE – The First Draft
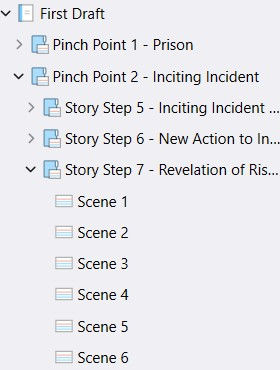
This is where the story gets written—but instead of writing in chapters, I write in scenes.
Every scene needs to carry micro-tension, and breaking it down like this helps me make sure each moment earns its place. Chapters will happen later (future Renee’s problem).
One of the biggest reasons I love Scrivener is the view options. I can toggle between:
Overview – The summary of each pinch point

Pinch Point View – All four story steps in each pinch point, complete with mini arcs and dramatic questions

Story Step View – The scene-level summaries for each step

Scene View – Where the actual words are written

Each scene includes a synopsis, notes, and sometimes even the song that helped me drop into the vibe while writing. ✨
SECTION TWO – Characters

At the time of writing, I’ve got 28 character profiles—and that number is growing.
Each profile starts with:
· Full name
· Profile image
· Six keywords that capture their essence
· A short overview (name, age, job, relationship status, personality snapshot)
Then I go deep: moral weakness, character arc, internal/external conflicts, demographics, appearance, relationships, personality—everything.

SECTION THREE – Worldbuilding

My fantasy world is made up of five kingdoms, all under the umbrella of Nazah (working title—but let’s be real, it’ll probably change).
Each kingdom has its own dedicated profile. When I open one, I see:
The kingdom name
A visual that captures its vibe (like a city shot for Qil, the golden capital)
Six words or phrases that encapsulate the kingdom’s feel
A full breakdown using the three tiers of worldbuilding:
Foundational
Spiritual
Cultural
If you want to dive deeper into those tiers, I’ve broken them down in this blog post here.
I’m a firm believer that the writer should know everything about their world—even if the reader doesn’t. Because if the foundation isn’t solid, readers will feel the holes.

SECTION FOUR – Planning & Research

This is my Bible section.
It holds:
My outline
My big-picture series plan
Notes on themes, relationships, plot threads
Research from masterclasses, blog posts, and past story versions
My previous draft—useful for stealing snippets when they still fit (And no, this isn’t me re-writing the same chapters from a previous attempt at writing this book. It’s me reclaiming old ideas that still hold gold!)
SECTION FIVE – Notes

My Notes section is basically a chaos dump.
Random plot ideas?
Future edits?
Quotes I want to use later?
The absurdly weird stuff that pops into my head while showering?
It all goes here. It’s messy and wild, and I love it. My virtual workbook.
SECTION SIX – Templates

This one’s simple: all my blank templates live here so I can duplicate them whenever I introduce a new character, write a new scene, or build out another part of my world.
Think:
Character profile template
Scene template
Worldbuilding template
Political system builder
Basically, it’s my starter pack shelf.
Final Thoughts
And so that’s how I’ve built my Scrivener workspace: my Pinterest inspo, Spotify playlists, characters, kingdoms, and chaos—all in one place.
The best part? Scrivener works across devices. I can log in from any computer if I need to (though let’s be honest—I always want my own laptop because comfort and familiarity are top priorities when writing).
SIDE WARNING: If you are a Microsoft desktop user, do not invest in the Scrivener phone / iPad app if you plan on using the desktop program. It’s not the same program, and it doesn’t sync. I learned the hard way and had to ask Apple for a refund (they very kindly delivered).
If you’ve been looking for a way to organise your fantasy world and stay inspired while you write—I hope this gave you a few ideas to play with.
Happy writing,
Renee Ella
If you loved the juicy tips and actionable steps from this post, be sure to subscribe below to be the first to know when the next one drops!


Comments